RavenDB: start your engines
This post is intended to be an introduction to RavenDB and as all the introduction will deal with the basic steps required to setup the development machine.
The first step is to download the RavenDB binaries from the RavenDB site: http://ravendb.net/download#builds.
Once downloaded remember to unblock the compressed archive before extracting files to the hard drive.
First run
After the file extraction the directory structure should be something like the following:
Figure: file and folder structure from RavenDB build 573.
There are 2 different server versions (the highlighted folders in the above figure):
- “Server” folder contains server binaries already setup to run as a console application or as a Windows service;
- “Web” folder contains server binaries setup to run as an IIS hosted application;
During the development process the console version is a real life saver because it gives real time access to server logs. In order to start the console version it’s enough to jump into the server folder and double click on the Raven.Server.exe file.
What happens is that the server starts, the first time it can take some time due to the operation performed to setup the environment fir the first time. Once the server is started the console should look like the following screenshot:
Figure: the console running a RavenDB server instance.
Side note: you can be presented with the Windows Firewall authorization dialog, as the following:
Obviously you need to give appropriate permissions if you need to access your local server from another machine.
The console immediately gives some important information:
- The data directory where data are stored;
- The server url, host name and listening port;
- The storage engine type, on Windows the default is Esent;
And now?
Once the server is running the first thing we can do is trying to connect using the builtin management studio, the studio is a Silverlight application that can be launched simply pointing the browser to the listening server Uri:
Figure: the RavenDB management studio running in Chrome.
Obviously the database, the default database that is created at server startup, is empty. At the bottom of the “summary” page there is a button that starts the creation process of a bunch of sample data. After the creation of the sample data your collections should look something like:
Figure: database collections just after the sample data creation process has completed.
The server console immediately confirms that something is going on at the server side:
Figure: the RavenDB server console showing real time logs.
Are you “secure”?
no…it’s not an Italian false friend, I’m pretty sure ![]() One question that some readers could raise is: how can it be that the server let a connected, and apparently anonymous, application to write data?
One question that some readers could raise is: how can it be that the server let a connected, and apparently anonymous, application to write data?
Well…
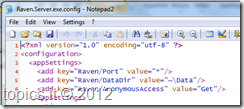
The first thing we need to understand is the RavenDB security model: when running in the console mode the default security model is Windows authentication (oAuth is an option too) and the access level, the anonymous access level, can be controlled via the server configuration file:
Figure: the configuration file showing the Raven/AnonymousAccess configuration setting.
The anonymous access setting support 3 different values:
- None: anonymous access is not allowed;
- Get: anonymous clients has just read-only permissions;
- All: anonymous clients are full trusted clients and can do everything;
So?
As we can see the current running value is “Get”, but since the studio is connecting to localhost it is basically running in “intranet” mode and thus is passing the current user credentials to the RavenDB server that, using Windows authentication, can trust the incoming requests: that’s why we could create data even if no one asked us any credential.
Enough for the moment…next time we’ll see how to connect to the server using our own application.
.m


