Running RavenDB on Windows Azure with Replica
We have seen how easy is to setup RavenDB on Azure using a Virtual Machine, nothing so different from what we would do on a regular on premise VM/bare metal.
The funniest thing is that the RavenDB configuration for replica is just a matter of seconds, the time consuming part is the Azure configuration.
Service Level Agreement
One of the key point of providing a service in the cloud is to give to our customer a SLA, a guarantee that the service we provide with our application will be available whenever the customer needs it.
Using Azure Web/Worker Role(s) it is a trivial stuff, just deploy more instance of the same role, but with VM is up to us to manage the whole topology of the network and to setup VM balancing, if required, and redundancy.
Why running in a VM?
We have seen that we can easily setup RavenDB using a Worker Role but
RavenDB Replica support
Using RavenDB we can leverage the power and simplicity of the Replication Bundle so set up a replica-set, let’s say that we want to setup the simplest possible scenario: master-slave.
First of all we need another virtual machine, can we “copy” the already existing one: yes, but wait a minute.
Azure networking
The first problem we have is to understand how we can allow communication between virtual machines laying in an Azure datacenter. There a re a couple of possible approach:
- Availability Set: Azure has the concept of availability set, a sort of logical grouping, and the documentation states that virtual machines (and so also web and worker roles) living in the same availability set, or defined in the same cloud service, are able to communicate without any configuration (other than the machine on board firewall that obviously should be configured to accomplish your needs)…I have tried everything without any success… :-/
- Virtual Network: Azure has recently introduced the concept of virtual networks, it is basically a network definition that guarantees isolation and communication to the machines defined in the virtual network, the amazing thing, even if out of our current scope, is that we can use virtual networks to create a network between the cloud network and our on premise network.
The main difference, as per the documentation, between the two is that in the first one we get name resolution for free and in the second one we should provide our own DNS service to have name resolution, but in order to setup the replica we can use machine IP addresses and the Virtual Network gives us something called persistent IP, a sort of a DHCP infinite lease; so we do not need any DNS to setup the replica.
At the time of this writing the biggest problem of the Virtual Networks is that there is no support to add an existing VM to a virtual network, we need to add the VM to the network at creation time.
Create the Virtual Network
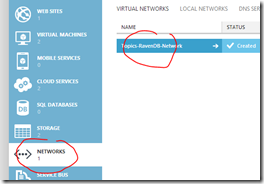
Since we need to define the Virtual Network before creating the VMs the first step is to create di network, via the Azure management portal go to the network tab:
And create a new network, I skip the 2 creation steps since they are just a network definition made of a name, an address space and a optional subnet.
Shutdown the VM and Capture it
Now…we have a running VM that cannot be added to the virtual network and we need another VM with exactly the same configuration, the easiest approach is:
- “Sysprep” the OS, running sysprep.exe from Windows\System32\Sysprep, choosing the following options:

- Wait for the sysprep process to complete, wait, wait, wait…I waited for 15 minutes…it’s along way to the top…;
- Use the capture function of the Azure portal to create a image of the VM, once the capture is completed:
- The original VM is deleted;
- You have a new image in the gallery ready to use to create ne VMs;
Create 2 VMs based on the captured image
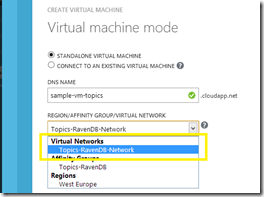
Create 2 new VMs using the previously created image and be sure to add the VM the existing virtual network:
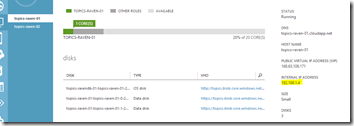
Once the VM is up & running and the installed RavenDB is accessible from the internet (be sure as in the single machine installation to add the both the VMs an http endpoint as usual) go to the Azure portal and take a look at the network configuration of the machines:
Both machines have an internal IP address that belongs to the subnet mask defined in the virtual network.
Setup RavenDB replica
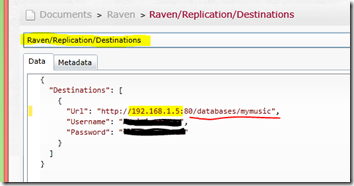
Install the Replication Bundle on both machines adding the Raven.Bundles.Replication assembly to the Plugins directory, now go to the RavenDB Studio of the machine that will be the master server, select the database you want to replicate the the slave server and create the replica setup document:
We also add credentials info the the document since we are using Windows Authentication, there is also a option to specify a connection string in the web config and thus encrypt the config section for security purpose.
As soon as you save the document if you move to the Logs tab of the Studio you can see that RavenDB has immediately noticed that something interesting has happened:
The final step is to test everything, pop up a new browser pointing to the slave server, go back to the master and create a new document:
A couple of seconds after we created the new document (with id “Users/3”) on the primary server the same document pops up on the slave one, and the log on the master server confirms that everything is running as expected:
Amazing, all this stuff is simply amazing :-P
.m


