
Develop like a boss with Visual Studio Code Remote Containers
You’re finalizing a workshop that you plan to deliver in a couple of weeks. You’re working on exercises and samples. Attendees will run examples and exercises on their machines. The workshop will be delivered online, giving you near-zero options to help them if something goes badly. To complicate things even more, attendees will join using their own computers, running Windows, macOS, or Linux. You’re sitting at your desk, and for the last four hours, you’ve been ping-ponging between the samples and exercise requirements and trying them. Meanwhile, you realize that you are missing a configuration bit there, an operating system setting here, and installing a third-party tool. You hardly see the light at the end of the tunnel, not to mention that your confidence with Linux is the same as petting a hungry cheetah. At least that’s my level of confidence with Linux.
If that’s you, you’re not alone. That was me more or less six weeks ago.
It doesn’t have to be so hard
Visual Studio Code is a fantastic tool that surprises me at every step. For example, a few versions ago, the Code folks introduced the concept of remote development.
In a nutshell, remote development allows you to run a Visual Studio Code server from a remote location and forward the Code user interface (UI) to your local shell. Of course, you can host the UI shell locally in the browser too!
Deep dive into the architecture and all bells and whistles by reading the official Code documentation about Developing inside a Container. For the sake of this article, a picture is worth a thousand words:

Courtesy of Developing inside a Container, Visual Studio Code documentation
What does Code allow us to achieve?
Let me put it very simply. Code remote development allows to set up an entire development environment with just four requirements that any major operating system meets. When I say complete development environment, I mean a development environment with all the bells and whistles you can imagine. For example, for the workshop I mentioned above, the development environment is composed of a RabbitMQ instance, two PostgreSQL instances and a C#/.NET 5 dev environment configured to allow building and debugging .NET applications.
The complete sample is available on GitHub in the mauroservienti/distributed-systems-101 repository.
The four requirements are the following:
- Visual Studio Code
- The Remote Development extension pack
- Docker
- Docker compose, which comes pre-installed with Docker for Windows and Mac, needs to be installed separately in Linux.
Once a machine meets the mentioned requirements, what we can do is as simple as creating a .devcontainer folder, and within the folder store two files, to begin with:
- A
devcontainer.jsonfile that specifies the development environment configuration. - A
Dockerfilewith the definition of the Docker container image to build and serve.
Let’s have a look at the latter first, the Dockerfile:
# [Choice] .NET Core version: 5.0, 3.1, 2.1
ARG VARIANT=5.0
FROM mcr.microsoft.com/vscode/devcontainers/dotnet:${VARIANT}

# [Option] Install Node.js
ARG INSTALL_NODE="true"
ARG NODE_VERSION="lts/*"
RUN if [ "${INSTALL_NODE}" = "true" ]; then su vscode -c "umask 0002 && . /usr/local/share/nvm/nvm.sh && nvm install ${NODE_VERSION} 2>&1"; fi

# [Option] Install Azure CLI
ARG INSTALL_AZURE_CLI="false"
COPY library-scripts/azcli-debian.sh /tmp/library-scripts/
RUN if [ "$INSTALL_AZURE_CLI" = "true" ]; then bash /tmp/library-scripts/azcli-debian.sh; fi \
    && apt-get clean -y && rm -rf /var/lib/apt/lists/* /tmp/library-scripts

# Update args in docker-compose.yaml to set the UID/GID of the "vscode" user.
ARG USER_UID=1000
ARG USER_GID=$USER_UID
RUN if [ "$USER_GID" != "1000" ] || [ "$USER_UID" != "1000" ]; then groupmod --gid $USER_GID vscode && usermod --uid $USER_UID --gid $USER_GID vscode; fi
USER $USER_UID:$USER_GID

# [Optional] Uncomment this section to install additional OS packages.
# RUN apt-get update && export DEBIAN_FRONTEND=noninteractive \
#     && apt-get -y install --no-install-recommends <your-package-list-here>

# [Optional] Uncomment this line to install global node packages.
# RUN su vscode -c "source /usr/local/share/nvm/nvm.sh && npm install -g <your-package-here>" 2>&1
Nothing fancy, just a standard Dockerfile. In this specific case, it creates a .NET 5 Docker image. By default, the created Docker image comes with Node.js installed and optionally with the Azure CLI. If configured to do so, it customizes some security settings.
The devcontainer.json is much more interesting. This file contains all configuration settings that the Remote Containers extension will use to configure the remote environment:
{
    "name": "C# (.NET) and RabbitMQ",
    "dockerComposeFile": "docker-compose.yml",
    "forwardPorts": [ 4369, 5671, 5672, 15671, 15672, 25672, 5432, 6432 ],
    "service": "demos",
    "workspaceFolder": "/workspace",

    // Set *default* container specific settings.json values on container create.
    "settings": {
        "terminal.integrated.shell.linux": "/bin/bash",
    },

    // Add the IDs of extensions you want installed when the container is created.
    "extensions": [
        "ms-dotnettools.csharp",
        "ckolkman.vscode-postgres",
    ]
}
Let’s start from the end of the file. In this case, the configuration adds two extensions to Visual Studio Code, the C# tools and the PostgreSQL client. The exciting thing is that Code, once disconnected from the remote development environment, will revert any extension configuration. As we mentioned previously, the local Code instance is just a shell “showing” stuff from the remote Code server. Thus, the remote Code server is the one that gets configured with the listed extensions, and that reflects into the local user interface. Similarly, the configuration file sets the terminal defaults to bash.
The workspaceFolder tells Code how to map the Code workspace to the container file system. For example, let’s assume on your local machine code-related files and folders are in “c:\dev,” and that folder is mapped as a resource in Docker. “c:\dev\myRepository” is the root folder of the project we’re working on, the one where the .devcontainer folder is stored. When opening the project folder, the Code Remote Container extension will map it, inside the container, to the folder specified by the workspaceFolder setting value.
The following three settings are what make the whole experience extremely cool. They specify how the Remote Container extension interacts with Docker Compose and how containers are exposed to the local machine. The linked Docker Compose file is a regular Compose file I won’t describe in detail. When the main container image is built and run, the Remote Container extension will also execute Docker Compose. The resulting infrastructure is, as mentioned earlier, a RabbitMQ instance, two PostgreSQL instances, and a C#/.NET 5 dev environment.
If you take a look at the Docker Compose file I’m using, you’ll notice that all containers share the same network, which makes sense since they need to communicate. So we can take advantage of that and use the forwardPorts setting to expose Docker network ports to the local machine.
The Remote Container extension will remap and expose ports to the local machine allowing the local machine to access remote resources. When running Code connected to a remote container development environment, the Code user interface lists the exposed ports in a tab at the bottom:
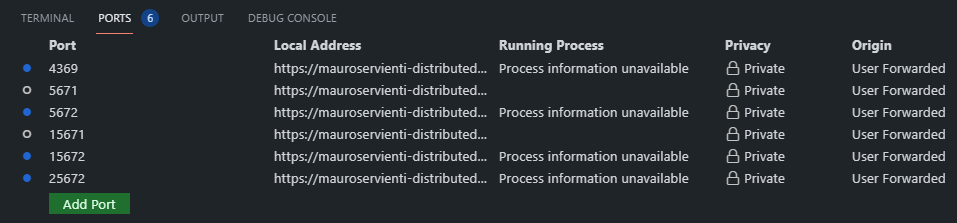
As you can see, local ports are randomly generated and mapped to remote ports to avoid any conflict with services already running locally.
Conclusion
Visual Studio Code has endless options. The Remote Containers extension pack brings it to the next level allowing us to just define the configuration of the development environment we want without worrying about how to set it up. As a bonus, if all that described lives in a GitHub repository, it automatically works with GitHub Codespaces, bringing the whole experience to the browser. Yes, you got that right. When using Codespaces, the only requirement is a modern browser.
Photo by Edu Lauton on Unsplash